Skip to content
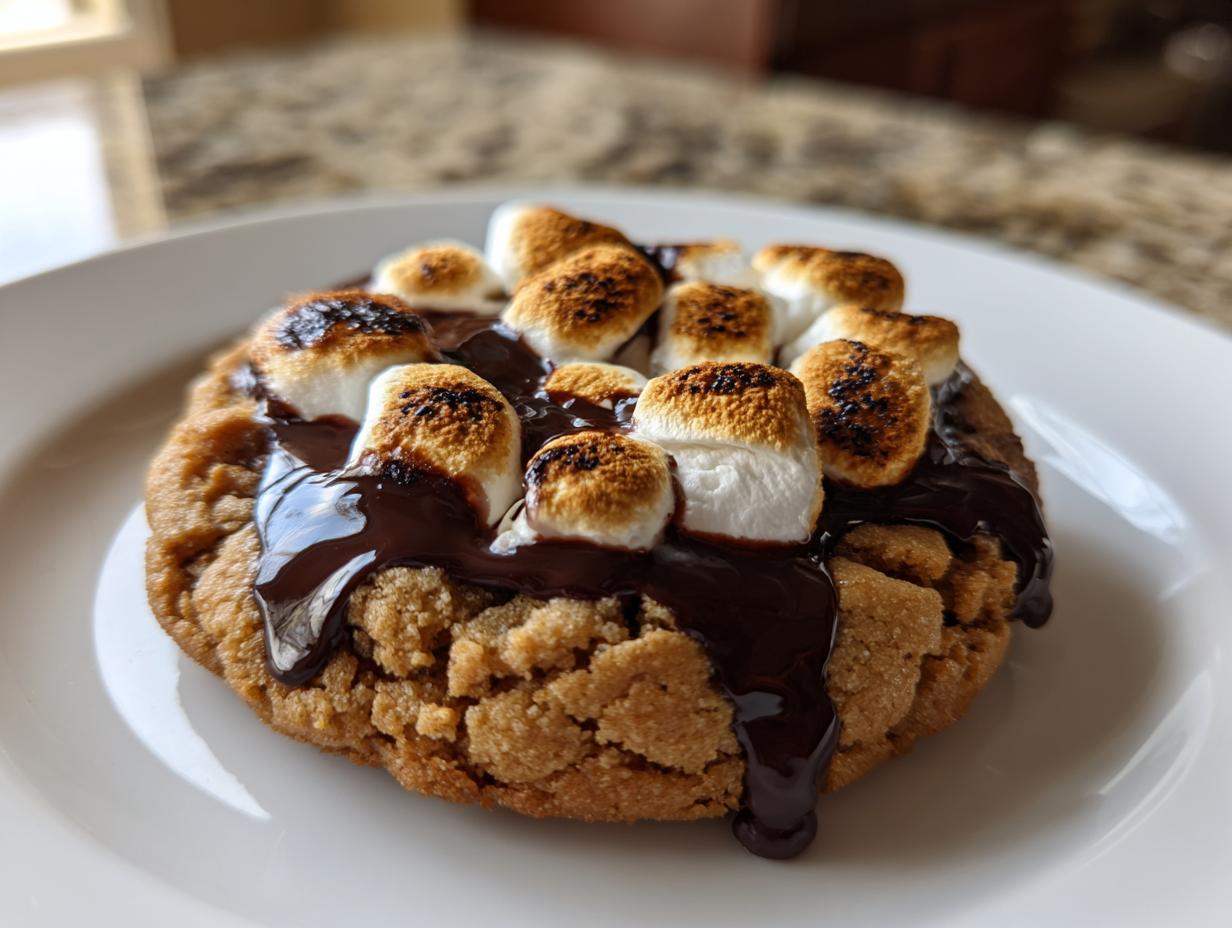
If you miss the smell of a crackling campfire but really just want dessert, then these S’mores Cookies are about to become your new obsession! Seriously, we’re taking that iconic campfire treat—graham crackers, melted chocolate, and gooey marshmallows—and putting it into a perfectly chewy cookie. It’s pure magic, and honestly, it’s easier than finding dry kindling.
I am Anna Kowalska, and here I share tried-and-true homemade recipes that you and your family will love. Everything is made with heart and flavor. I developed this recipe because sometimes you need that nostalgic, messy, wonderful flavor without having to pack up the car and drive to the woods. These S’mores Cookies deliver that flavor bomb right onto your kitchen counter.
Jump to:
Essential Ingredients for Perfect S’mores Cookies
To make sure these S’mores Cookies taste exactly like they were roasted over an open fire, you need to pay attention to what you’re using. It’s not just about dumping things in a bowl; the quality of your components really shines through, especially with something as classic as this. Trust me, I’ve tested batches where I skimped on the butter, and they just weren’t the same!
We need a good balance of chewy cookie, crunchy cracker, melted chocolate, and that pillowy marshmallow top. Getting your ingredients ready before you start mixing is half the battle. This is how you ensure your S’mores Cookies turn out perfectly textured every single time.
Gathering Your S’mores Cookies Components
Go ahead and grab everything listed below. I find it helps so much to have all your chocolate broken up and your crackers crushed before you even turn the mixer on. Read the little notes in the table—they are important for the best S’mores Cookies result!
Ingredient List Table
| Ingredient | Quantity | Preparation Note |
|---|---|---|
| Salted Butter | 1 cup | Must be softened |
| Light Brown Sugar | 3/4 cup | Packed firmly |
| Granulated Sugar | 1/2 cup | Regular white sugar is fine |
| Large Eggs | 2 | Room temperature is best |
| Vanilla Extract | 1 teaspoon | Use the good stuff! |
| All-Purpose Flour | 2 1/2 cups | Measure carefully |
| Cornstarch | 2 teaspoons | This is our secret for chewiness |
| Baking Soda | 1 teaspoon | |
| Salt | 1 teaspoon | |
| Mini Marshmallows | 2 cups | Divided for mixing and topping |
| Graham Crackers | 2 cups | Broken into small pieces (about 9-10 full crackers) |
| Milk Chocolate Chips | 1/2 cup | |
| Semisweet Chocolate Chips | 1/2 cup | |
| Hershey’s Bars | 2 bars | Broken into small chunks for topping |
Why You Will Love These S’mores Cookies
Honestly, this recipe has everything you want in a perfect homemade cookie, but with that campfire twist. It’s fast, it’s fun, and it hits all the right nostalgic notes. You don’t need a fire pit or even good weather to enjoy these!
Here is why I think these S’mores Cookies are going to be a staple in your house, just like they are in mine:
- Speedy Baking Time: Seriously, from start to finish, these are done in under 30 minutes. That’s faster than waiting for a bonfire to get going properly!
- Amazing Texture Contrast: You get the soft, slightly dense cookie base hugging the gooey melted chocolate, all balanced by that slight crunch from the graham crackers mixed inside.
- The Toasted Finish: That final minute under the broiler for the marshmallows? It’s non-negotiable. It gives you that authentic, slightly smoky, caramelized flavor that makes these S’mores Cookies irresistible.
- Kid-Friendly Fun: Everyone loves assembling the tops before the final bake. It turns cookie making into a fun activity for the whole family.
Equipment Checklist for Best S’mores Cookies Results
You don’t need a ton of fancy gadgets for these S’mores Cookies, but having the right tools makes the process so much smoother. If you’re organized, these come together in a flash! Make sure you have these items ready before you even think about creaming that butter.
- Two sturdy baking sheets.
- Parchment paper—you absolutely need this for easy cleanup, especially with the gooey marshmallows!
- A large mixing bowl and an electric mixer (handheld or stand mixer works great for creaming).
- A rubber spatula for scraping down the sides.
- A scoop (about 2-3 tablespoons) for consistent sizing of your S’mores Cookies dough balls.
- Tongs or a small offset spatula if you plan on moving the cookies right after broiling.
Step-by-Step Instructions for Amazing S’mores Cookies
Okay, this is where the real fun begins! We are going to take these simple ingredients and turn them into the most incredible S’mores Cookies you’ve ever tasted. Remember, the secret to a great cookie base is how you handle the butter and sugar, so don’t rush that first step!
Preparing the Dough Base for Your S’mores Cookies
First things first: get that oven preheated to 375° F. Line up two baking sheets with parchment paper—this prevents sticking later when things get extra gooey. Now, in a big bowl, throw in your softened salted butter along with both the light brown sugar and the white granulated sugar. Beat this mixture for a good two to three minutes until it looks creamy and lightened up a bit. This creaming is what gives your S’mores Cookies that lovely texture!
Next, drop in your two large eggs one at a time, making sure each one is fully incorporated before adding the next. Follow that up with the vanilla extract and give it another quick beat. Now for the dry stuff: in a separate bowl, whisk together your flour, cornstarch (don’t skip that, it helps the chew!), baking soda, and salt. Add this dry mixture to your wet ingredients, but only mix until you *just* see everything come together. Stop mixing right there! Overmixing develops gluten, and we want soft S’mores Cookies, not tough ones.
Mixing in the S’mores Cookie Fillings
This is the moment we add the flavor bombs! Take about a cup and a half of those broken graham crackers, a cup and a half of the mini marshmallows, and all of your milk and semisweet chocolate chips. Gently fold these goodies into your cookie dough using a spatula. You just want them dispersed evenly throughout the dough—don’t overwork it now! We are aiming for pockets of melted chocolate and cracker crunch in every bite of these S’mores Cookies.
Scoop out balls of dough, about two to three tablespoons each, and place them on your prepared sheets. Make sure you leave plenty of space between them because these cookies spread out nicely when they bake.
Baking and The Signature Marshmallow Topping for S’mores Cookies
Pop those sheets into the preheated oven and bake them for exactly 10 minutes. They should look *almost* done—set but not deeply browned. Pull them out carefully! Now, this next part makes these S’mores Cookies famous: quickly press 4 or 5 more mini marshmallows right on top of each warm cookie. Then, press a couple of those extra broken graham cracker bits and a few chunks of the Hershey’s bar right onto those marshmallows.
Return the sheets to the oven for just another minute or two until the cookie edges look set. If you want that beautiful, caramelized campfire look on your S’mores Cookies, switch the oven to broil. Watch them like a hawk! The little marshmallows will toast incredibly fast—seriously, 30 seconds can be the difference between perfect and burnt. Once they are golden brown and bubbly, pull them out immediately. Let the S’mores Cookies cool on the pan for about three minutes before moving them to a wire rack to finish cooling completely.
Tips for Achieving Expert S’mores Cookies Texture
Getting the perfect chew in these S’mores Cookies comes down to a few little secrets I learned through trial and error—mostly error when I tried to rush things! The goal here is a cookie that’s soft in the center but holds up beautifully under all those gooey toppings. Spreading too much is the enemy, so we fight it with science!
If your dough seems too soft when you scoop it, that’s usually a sign the butter was too warm, or maybe you eyeballed the flour. A slightly firmer dough means less spreading in the oven, resulting in those wonderfully thick S’mores Cookies we are aiming for. Don’t be afraid to chill the dough for 15 minutes if your kitchen is warm!
Ingredient Notes and Substitutions for S’mores Cookies
Listen, the temperature of your butter is critical. It needs to be soft enough to mix easily but still cool to the touch—if it’s greasy or melting, your S’mores Cookies will flatten into pancakes. Also, using that cornstarch is non-negotiable for me; it absorbs a tiny bit of moisture and helps create that satisfying chewiness that separates a good cookie from an amazing one. Baking science is fascinating!
When it comes to chocolate, you need variety! I use both milk and semisweet chips because the milk chocolate melts softer, and the semisweet keeps it from getting overly sweet. For the topping, you really need a classic milk chocolate bar like Hershey’s because it melts perfectly under the broiler, but if you don’t have them, any good quality plain milk chocolate bar broken into small pieces will work just fine for topping your S’mores Cookies.
Storing and Reheating Your Delicious S’mores Cookies
The hardest part about making these S’mores Cookies is waiting for them to cool down, but the second hardest part is making sure they stay perfect for later! Since these have those lovely, gooey marshmallows, storage needs a little strategy. You don’t want them turning sticky or cracker-y too fast. Luckily, these hold up really well if you follow a few simple rules for your S’mores Cookies.
We want to protect that chewy base, so keeping them away from excessive moisture is key. Here’s a quick guide on how long you can keep these treasures around and the best way to warm them up when you want that fresh-from-the-oven feeling again. If you are looking for other great dessert ideas, check out my desserts section!
Storing S’mores Cookies Properly
You should store your S’mores Cookies in an airtight container. This is super important to keep that chewy texture locked in. If you leave them out on a plate, they’ll dry out fast, and the marshmallows might get too sticky from the humidity. They are perfectly happy sitting right there on your kitchen counter at room temperature for up to four or five days. Don’t worry about refrigeration unless your kitchen is extremely hot! For long-term storage, freezing dough balls is a great option, similar to how I store dough for my chewy chocolate chip cookies.
| Storage Method | Duration | Reheating Tip |
|---|---|---|
| Airtight Container (Counter) | 4–5 Days | Microwave for 10 seconds |
| Freezing (Dough Balls) | Up to 3 Months | Bake from frozen, add 3-5 minutes |
| Freezing (Baked Cookies) | Up to 2 Months | Warm slightly in the oven |
Frequently Asked Questions About S’mores Cookies
I get so many messages about these S’mores Cookies because everyone wants to know how to customize them or make the process easier. Since these are so popular, I wanted to answer the most common questions right here so you can start baking right away!
Can I make this S’mores Cookies recipe ahead of time?
Yes, you absolutely can! I often scoop the dough balls onto a parchment-lined tray and freeze them before baking. Once they are frozen solid, you can transfer them to a freezer bag. When you want fresh S’mores Cookies, just pull them out and add about three to five extra minutes to the initial baking time. They bake up perfectly from frozen, though you’ll still need to add the topping before the final minute!
What is the best type of chocolate for these S’mores Cookies?
I insist on using a mix! The milk chocolate chips give you that soft, melty pool in the center of your S’mores Cookies, while the semisweet chips cut the sweetness down nicely. For the topping, you really need a classic milk chocolate bar like Hershey’s because it melts into that signature gooey layer that caramelizes beautifully under the broiler. Don’t use chocolate intended for melting, as it might not get that nice, soft texture we are looking for in these amazing chocolate chip cookies. For more baking tips, you can read about the importance of ingredient temperature in my guide on bakery-style chocolate chip cookies.
Share Your S’mores Cookies Success
I poured my heart into making sure this S’mores Cookies recipe is absolutely foolproof for you. Now that you’ve made them, I’d love to hear all about it! Did you manage to catch the marshmallows perfectly under the broiler? Seriously, drop a comment below, tell me how many stars you’re giving these, and share any funny kitchen disasters you had while making them!
Print
Guaranteed 12 Amazing S’mores Cookies Now
- Total Time: 27 minutes
- Yield: About 2 dozen cookies 1x
- Diet: Vegetarian
Description
These S’mores Cookies bring the campfire classic right to your kitchen. You get a chewy cookie base loaded with chocolate and graham crackers, topped with gooey, toasted marshmallows. Anna Kowalska shares this favorite treat.
Ingredients
- 1 cup salted butter softened
- 3/4 cup light brown sugar packed
- 1/2 cup granulated sugar
- 2 large eggs
- 1 teaspoon vanilla extract
- 2 1/2 cups all-purpose flour
- 2 teaspoons cornstarch
- 1 teaspoon baking soda
- 1 teaspoon salt
- 2 cups mini marshmallows divided
- 2 cups graham crackers broken into small pieces (about 9–10 crackers), divided
- 1/2 cup milk chocolate chips
- 1/2 cup semisweet chocolate chips
- 2 Hershey’s bars broken into pieces
Instructions
- Preheat oven to 375° F. Line two baking sheets with parchment paper.
- In a large mixing bowl, combine butter, brown sugar, and granulated sugar. Beat for 2-3 minutes until creamy.
- Add eggs and vanilla extract and beat well until incorporated.
- Add flour, cornstarch, baking soda, and salt, mixing just until combined.
- Add 1 1/2 cups of the graham cracker pieces, 1 1/2 cups of the marshmallows, milk chocolate chips, and semisweet chocolate chips, stirring just until dispersed throughout the dough.
- Scoop 2-3 tablespoon size balls of dough onto the parchment lined baking sheets, leaving room for the cookies to spread.
- Bake for 10 minutes until almost done, then remove from the oven and press 4-5 additional marshmallows on top of each cookie, along with a couple extra pieces of broken-up graham cracker and Hershey bar.
- Return to oven and bake for 1-2 minutes until done. If desired, switch oven to broil and toast the marshmallows on top. Watch carefully as small marshmallows burn fast.
- Cool for 2-3 minutes on the pan before transferring to a wire cooling rack. Store in an airtight container on the counter for 4-5 days.
Notes
- Store cookies in an airtight container at room temperature for up to 4-5 days.
- Watch the cookies closely when broiling the marshmallows to prevent burning.
- Prep Time: 15 minutes
- Cook Time: 12 minutes
- Category: Dessert
- Method: Baking
- Cuisine: American
Nutrition
- Serving Size: 1 cookie
- Calories: 315kcal
- Sugar: 23g
- Sodium: 362mg
- Fat: 14g
- Saturated Fat: 8g
- Unsaturated Fat: 6g
- Trans Fat: 0g
- Carbohydrates: 44g
- Fiber: 1g
- Protein: 4g
- Cholesterol: 48mg