Skip to content
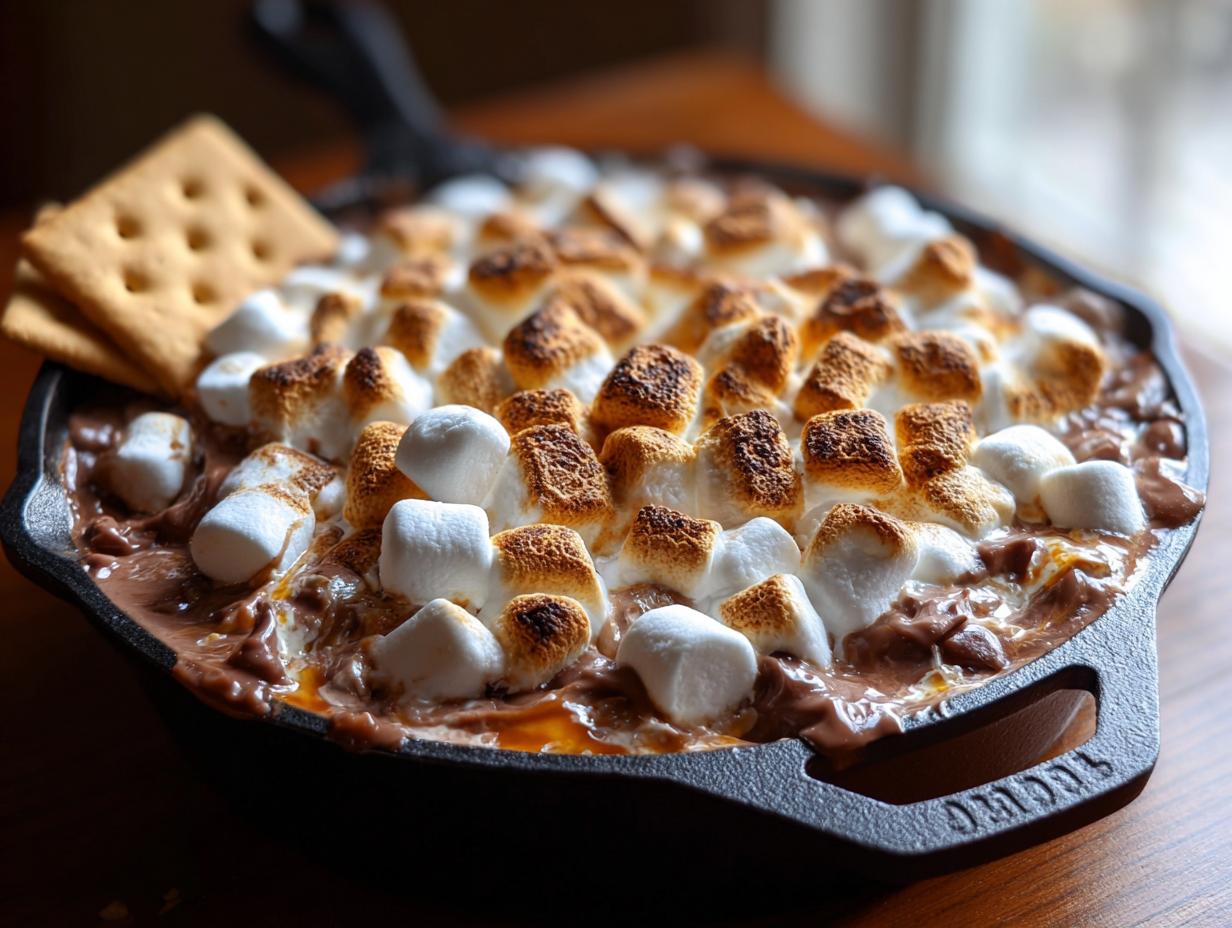
Are you craving that campfire magic but it’s raining outside? Don’t worry, I have the ultimate easy solution! My very quick S’mores Dip brings all the gooey, roasted goodness right to your kitchen table in minutes. I’m Anna Kowalska, and here I share tried-and-true homemade recipes that you and your family will love—everything is made with heart and flavor.
This recipe is all about capturing that nostalgic feeling without the sticky mess of a campfire. Because I test everything until it’s absolutely perfect for my own family gatherings, you know this chocolate dip is going to deliver that satisfying pull of marshmallow and rich melted chocolate every single time. Forget complicated baking; this is pure, simple dessert joy, ready before the kettle even whistles!
When I first started sharing my cooking online, I focused on simple, reliable comfort foods like this one. It’s a testament to how a few good ingredients, handled correctly, can create something truly special. You won’t believe how fast this goes from pantry to table.
Jump to:
Why You’ll Love This S’mores Dip Recipe
Seriously, this is the easiest, most satisfying treat I have in my back pocket for those nights when you just need a win. It’s pure, unadulterated comfort food that takes almost no effort. You absolutely need this recipe for your next movie night!
- It’s unbelievably fast—ready to eat in about 15 minutes total!
- That rich, gooey chocolate layer topped with perfectly toasted marshmallows is just heaven.
- It’s perfect for sharing; everyone crowds around the skillet with their crackers.
Quick Prep and Cook Time
I mean, look at the details! Two minutes of prep time, ten minutes in the oven, and it’s done. You can whip this up faster than you can decide what movie to watch. It’s my go-to when a dessert craving hits hard and fast.
Family Friendly Fun
There’s something magical about pulling a blazing hot skillet of chocolate and marshmallow out of the oven. My kids absolutely lose it! It’s messy, yes, but that’s part of the fun. It gets everyone dipping and scooping together right from the center of the table. It’s a guaranteed crowd-pleaser for all ages.
Essential Equipment for Your S’mores Dip
You don’t need a ton of fancy gadgets for this, which is another reason I love it so much! Having the right container is really the biggest key here so everything melts evenly and you get that beautiful presentation right out of the oven.
Choosing the Right Skillet
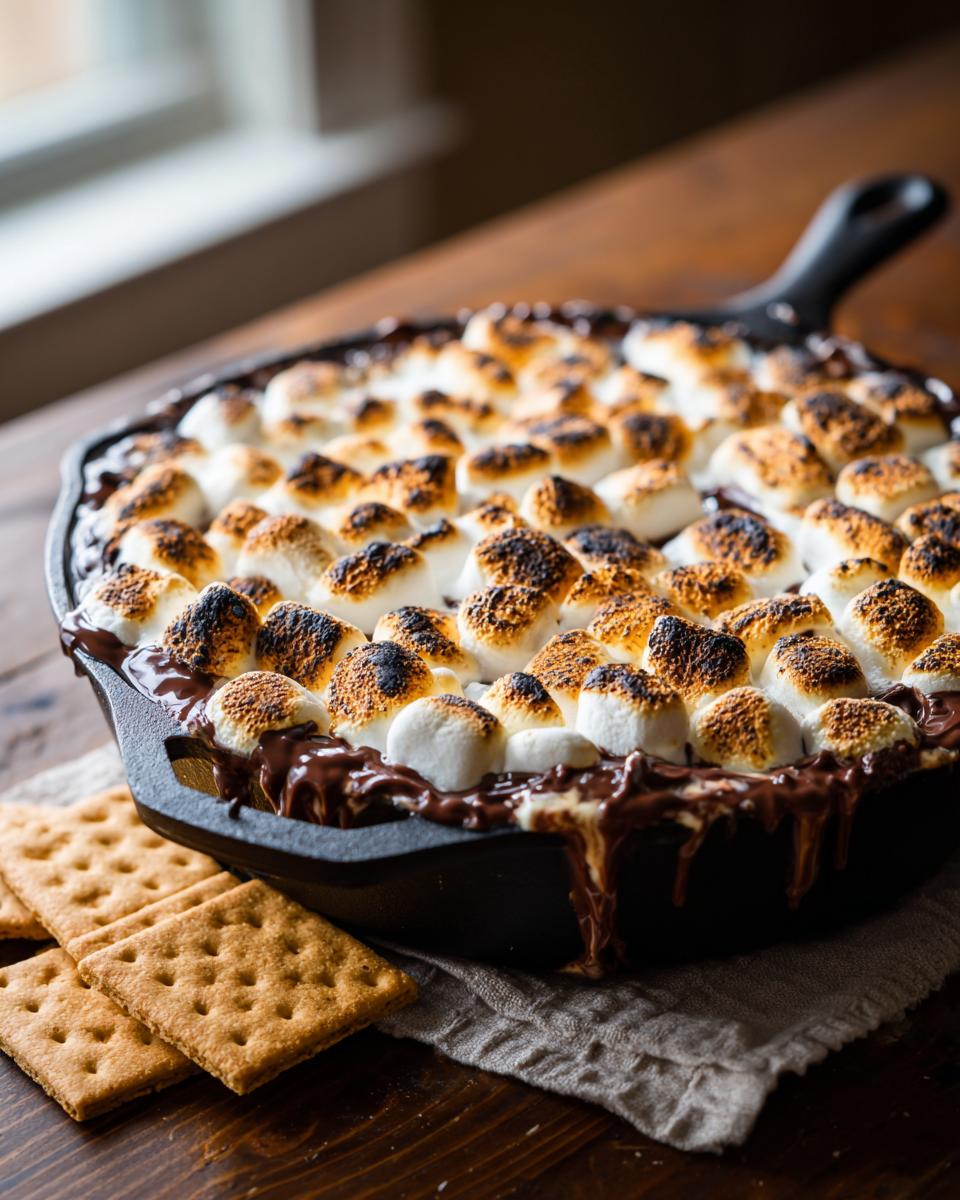
My absolute favorite way to make this is in an 8 or 9-inch cast iron skillet. Cast iron holds heat so well and gives the bottom layer of chocolate that perfect, slightly fudgy texture around the edges. Don’t panic if you don’t have one, though! A standard 8 or 9-inch round baking dish works just fine too. Just make sure whatever you use is oven-safe, obviously!
Gathering Ingredients for the Best S’mores Dip
Honestly, the ingredient list for this S’mores Dip is ridiculously short. That’s the beauty of it! You’re relying on three core components, so make sure the chocolate you pick is something you actually love eating. Since the total bake time is so short, the ingredients don’t have a lot of time to integrate fully, so their quality really shines through.
We’re using standard milk chocolate bars, but feel free to mix it up—I’ll talk more about that later! The marshmallows need to be the big ones; those tiny ones melt too fast and disappear into a sugary puddle before they get that nice toasted top layer we’re aiming for.
Ingredient Clarity and Specifications
When you break up your chocolate bars, try to keep the pieces relatively uniform in size. This helps them melt at the same rate across the bottom of the skillet. You don’t want giant chunks next to tiny crumbs! Also, make sure those graham crackers are ready to go right next to the oven, because once this dip is done, you need to serve it immediately before the marshmallow starts to deflate.
Here’s exactly what you need to pull together for a perfect batch:
| Ingredient | Quantity | Preparation Notes |
|---|---|---|
| Chocolate Bars (Milk or Choice) | 6 (1.55 oz bars) | Break along the lines; do not stack too high. |
| Large Marshmallows | 1 bag (approx. 10–12 oz) | Arrange evenly over the chocolate layer. |
| Graham Crackers | 1 sleeve | For dipping—have them ready! |
Step-by-Step Instructions for Perfect S’mores Dip
Alright, now that we have our ingredients lined up and our skillet ready, this is where the magic happens—and it happens fast! I promise you, you’ll be dipping graham crackers before you know it. Just follow these steps closely, especially around the baking time, because those marshmallows go from perfectly toasted to totally burnt in a blink!
Oven Preparation and Chocolate Layering
First things first, crank that oven up! You want to preheat it to 400°F. This high heat is what gives us that quick, lovely browning on top without turning the chocolate underneath into soup. While it’s heating, take your broken chocolate pieces and lay them right across the bottom of your skillet. Make sure they cover the entire bottom surface. You want them touching or slightly overlapping so you get a solid chocolate base, but please, don’t make big mountains of chocolate! If it’s too thick, the middle won’t melt properly, and we want even melting.
Marshmallow Placement and Baking Times
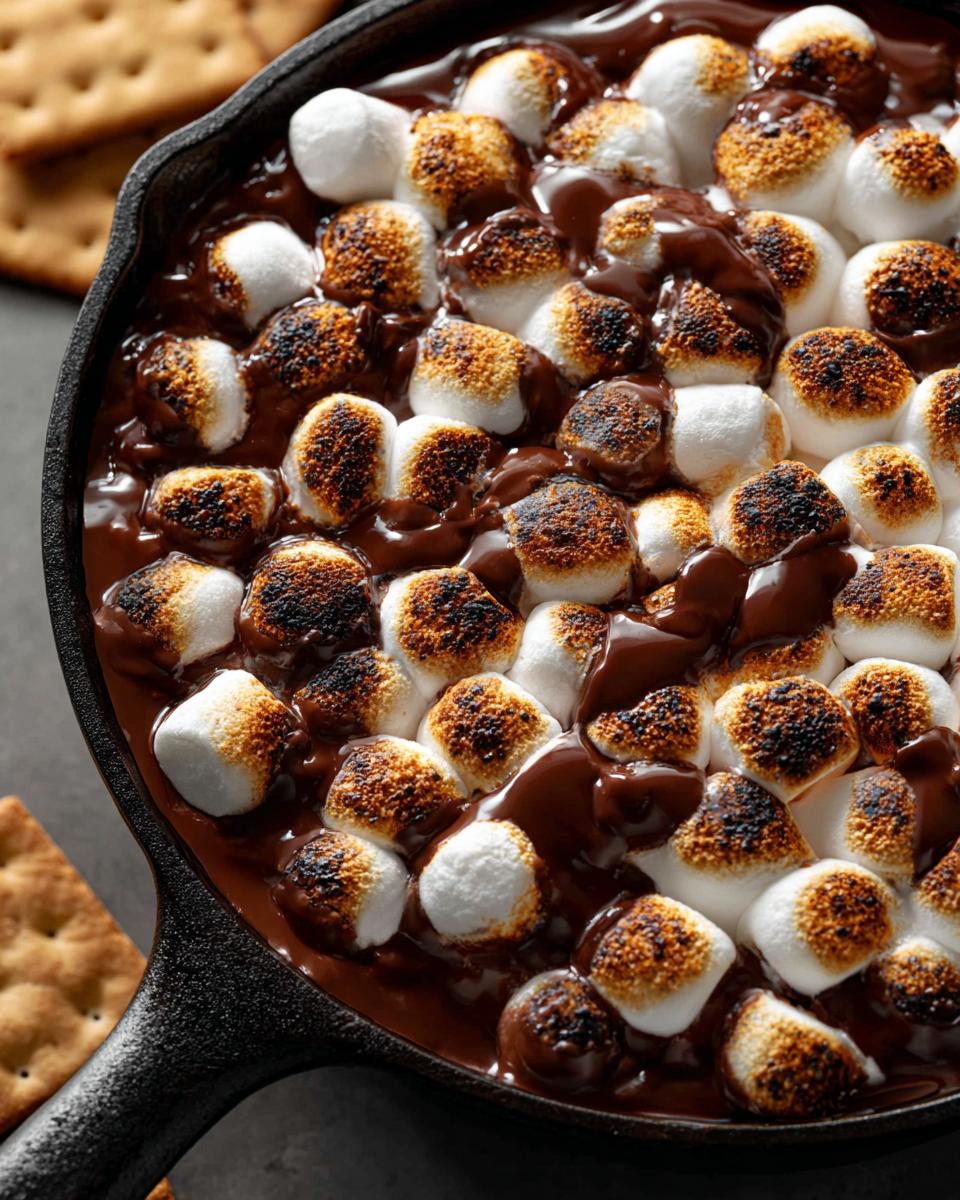
Next up are the stars of the show—the marshmallows! Take your bag of large marshmallows and arrange them snugly over that chocolate layer. Try to cover every bit of exposed chocolate you can. I like to put them close together so they puff up and meld into one giant marshmallow cloud while baking. Pop that skillet carefully into the preheated oven. Now, this is important: set a timer for 8 minutes, but start checking closely around the 5-minute mark. Seriously, watch them! They go from pale and puffy to golden brown so quickly.
Resting and Serving the S’mores Dip
Once those marshmallows are beautifully toasted—golden brown, maybe even a little bubbly—pull that skillet straight out of the oven. Be super careful, that cast iron is going to be screaming hot! Now, don’t rush this next step. You need to let the S’mores Dip rest on a cooling rack or heat-safe surface for about 5 minutes. This resting period lets the chocolate underneath finish melting down into that perfect, thick, gooey sauce. After five minutes, grab your graham crackers and dive right in, serving it straight from the skillet!
Tips for S’mores Dip Success
I’ve made this chocolate dip dozens of times, and I’ve learned a few little tricks that make the difference between a good dip and a truly amazing, share-worthy one. Trust me, these little tweaks I’ve picked up over the years will save you from crispy, sad marshmallows!
Achieving Golden Brown Topping
The biggest make-or-break moment is watching those marshmallows bake. They start puffing up around the 4-minute mark, but the color change happens fast. Once you hit 5 minutes, you need to stand guard! If your oven runs a little hot, you might see those edges start to brown too quickly. If that happens, just pull the skillet out for 30 seconds, let the color settle, and stick it back in. We want that lovely golden tan, not black charcoal, you know?
Ingredient Substitutions for a Unique S’mores Dip
While the classic milk chocolate is fantastic, this dip is begging for you to experiment! If you love a deeper flavor, swap out half the milk chocolate for good quality dark chocolate. It cuts the sweetness beautifully. My personal favorite twist for grown-up nights is using peanut butter cups instead of plain chocolate bars.
You can also try cookies and cream bars for a fun crunch factor! Just remember, whatever chocolate you choose, break it into similar-sized pieces so it melts evenly beneath that beautiful marshmallow cloud. It’s so easy to customize!
Answering Common Questions About Your S’mores Dip
I know when I first tried making an indoor s’mores experience, I had a million questions swirling around. It’s so simple, but you still want that perfect gooey texture! Here are a few things folks ask me most often about getting this chocolate dip just right for family dipping sessions.
How long does this S’mores Dip take to make?
This is the best part! You can have this incredible dessert ready from start to finish in about 12 minutes total time—that includes the two minutes of prep and the ten minutes of baking. If you’re in a real pinch, you can probably shave off a minute or two by using pre-broken chocolate, but honestly, the whole process is lightning fast. It’s the ultimate quick dessert when you need something sweet right away.
Can I use a different dish instead of a cast iron skillet for the S’mores Dip?
Yes, absolutely! While I preach about the cast iron skillet because it distributes heat so nicely, you can definitely use a standard 8 or 9-inch oven-safe baking dish. If you use glass or ceramic, just make sure you give it a generous coating of cooking spray or use a little bit of homemade cake goop if you have some handy. This prevents the chocolate from sticking hard to the bottom when it cools down.
How should I store leftover S’mores Dip?
Leftovers happen, though I rarely have any! If you do manage to save some of this marshmallow dip, just cover the skillet or transfer the leftovers to an airtight container. It keeps perfectly fine in the fridge for up to a week. When you’re ready for round two, just reheat it gently in the oven. It comes right back to life!
Storing and Reheating Your Delicious S’mores Dip
I know it’s hard to imagine having leftovers of this gooey chocolate dip, but sometimes we just can’t finish it all in one sitting! The good news is that this dip keeps really well, making it easy to enjoy again later in the week. Just make sure you store it properly so the chocolate stays soft and the marshmallows don’t get too hard.
When you’re ready to bring back that campfire flavor, reheating is super simple. You just need to give it a little gentle warmth to bring back that lovely, melty texture. Here is my quick reference guide for leftovers:
| Storage Duration | Reheating Method | Reheating Time |
|---|---|---|
| Up to 1 week | Oven at 350°F | About 5 minutes |
Share Your Family’s Experience with This S’mores Dip
Now that you’ve tried this lightning-fast chocolate dip, I just have to know how it went over at your house! Did you stick to the classic milk chocolate, or did you try a wild substitution? Drop a comment below and let me know how many dippers you had around the skillet. A rating helps others find this easy treat, too!
Print
Amazing 5-Minute S’mores Dip Joy
- Total Time: 12 minutes
- Yield: 6 servings 1x
- Diet: Vegetarian
Description
Enjoy this quick s’mores dip with melted chocolate, fluffy marshmallows, and graham crackers, perfect for family nights in under 15 minutes. This s’mores dip is perfect for families or anyone craving a fun indoor treat. Gooey chocolate and toasted marshmallows make it an irresistible dessert. It’s ready in minutes and pairs perfectly with graham crackers.
Ingredients
- 6 1.55 oz chocolate bars (milk chocolate or choice of chocolate)
- 1 bag large marshmallows (about 10–12 oz)
- 1 sleeve graham crackers for dipping
Instructions
- Preheat the oven to 400°F.
- Break the chocolate bars along the lines and place them in the bottom of an 8 or 9-inch cast iron skillet. Ensure pieces slightly overlap but do not stack too high.
- Arrange a layer of large marshmallows evenly over the chocolate.
- Bake in the preheated oven for 8–10 minutes or until marshmallows are golden brown on top, checking closely after 5 minutes to avoid burning.
- Remove the skillet from the oven and let it sit for 5 minutes so the chocolate continues to melt.
- Serve warm directly from the skillet with graham crackers for dipping.
Notes
- Optional: Try different chocolate types like dark chocolate, cookies and cream, or peanut butter cups for a twist.
- If using a regular baking dish, lightly grease it with cooking spray to prevent sticking.
- Leftovers can be stored in an airtight container in the fridge for up to a week. Reheat at 350°F for about 5 minutes until gooey.
- Prep Time: 2 minutes
- Cook Time: 10 minutes
- Category: Dessert
- Method: Baking
- Cuisine: American
Nutrition
- Serving Size: 1 serving
- Calories: 150 kcal
- Sugar: Unknown
- Sodium: Unknown
- Fat: 9 g
- Saturated Fat: Unknown
- Unsaturated Fat: Unknown
- Trans Fat: Unknown
- Carbohydrates: 15 g
- Fiber: Unknown
- Protein: 2 g
- Cholesterol: Unknown