Skip to content
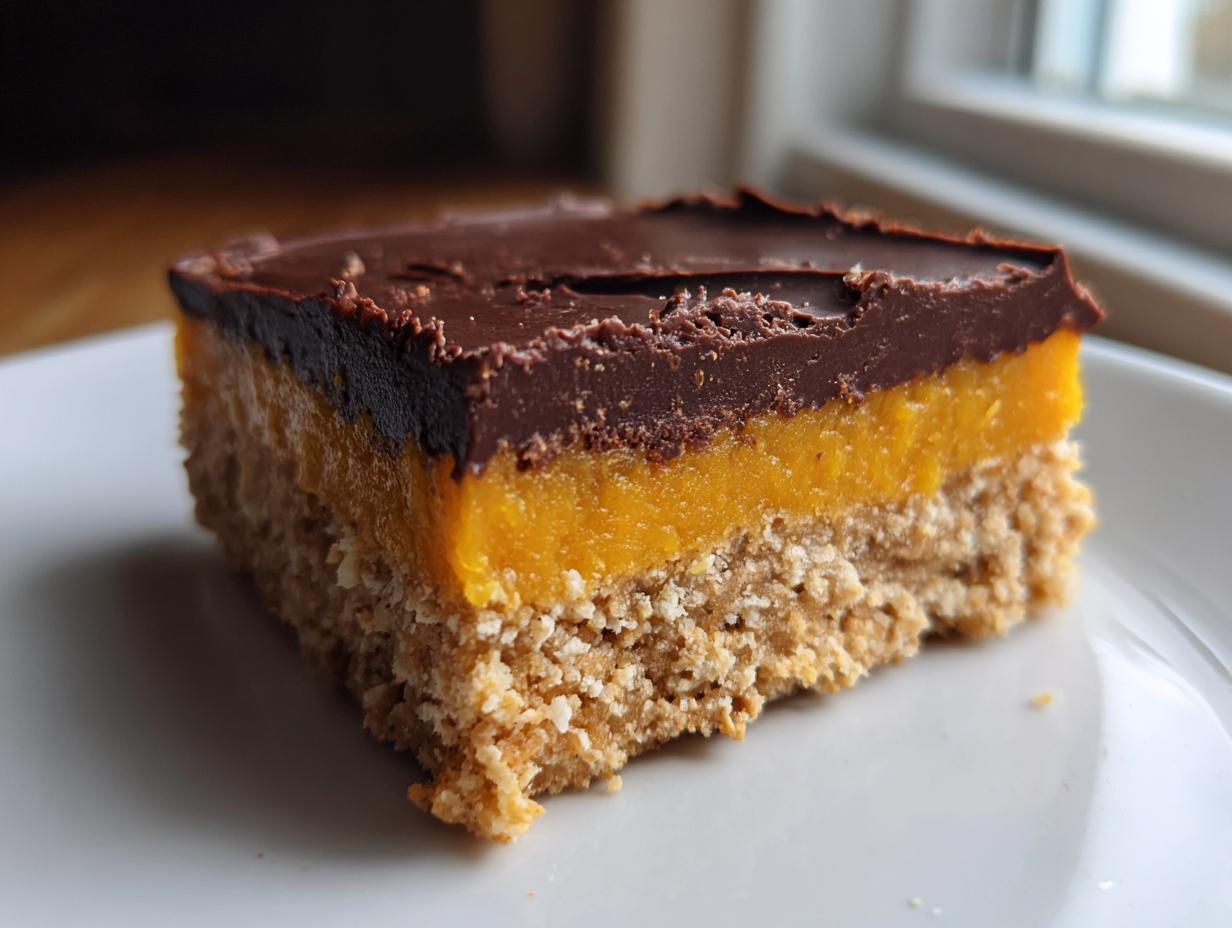
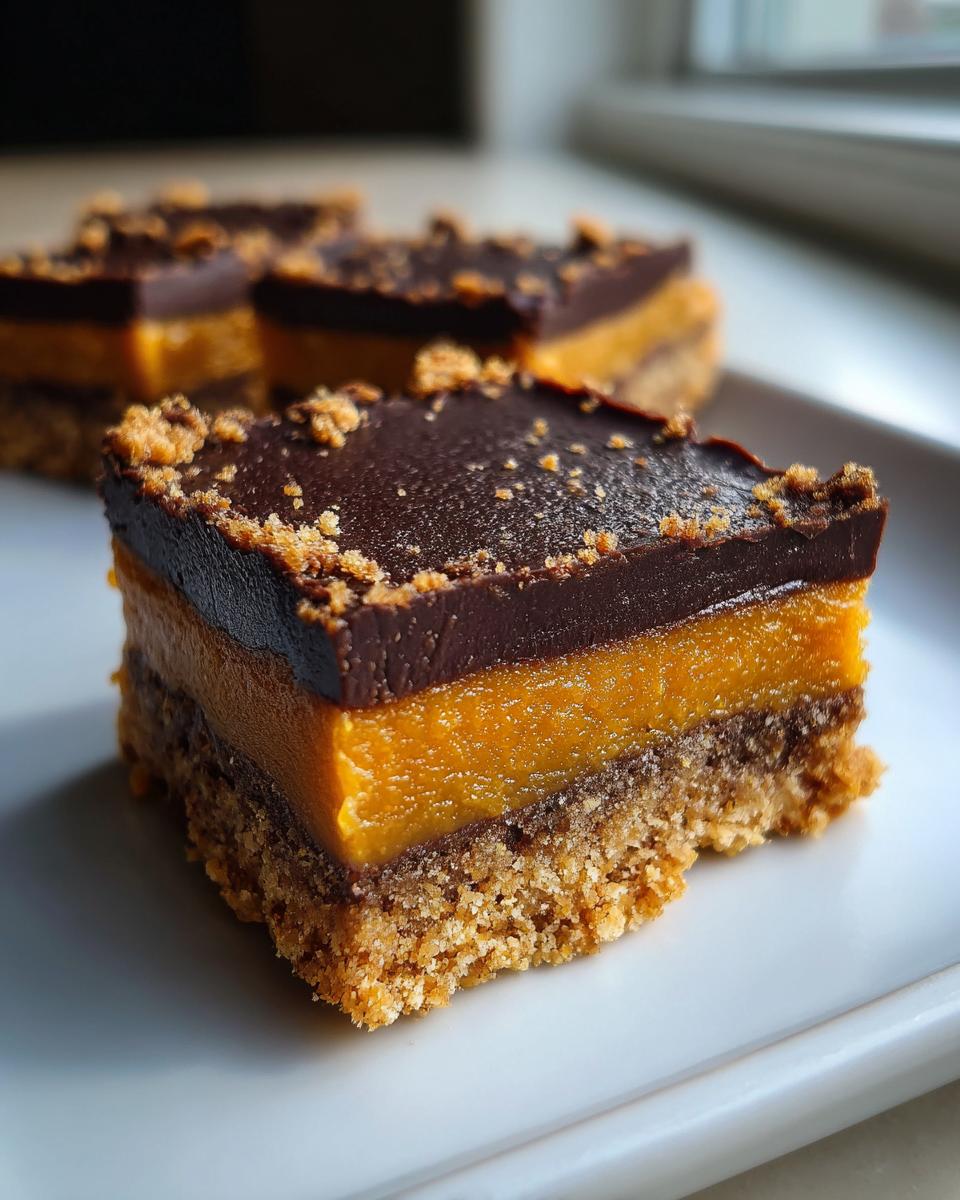
Are you tired of complicated baking projects that take all day? If you’re looking for a sweet treat that delivers maximum flavor with minimum fuss, you absolutely need to try my **Strawberry Chocolate Bars**. Trust me, these layered beauties are the answer to your busy weeknight dessert prayers!
Hi there, I’m Anna Kowalska, and here I share tried-and-true homemade recipes that you and your family will love. Everything I post is made with heart and flavor, which means I’ve already done the messy testing in my kitchen so you don’t have to. I’m all about creating desserts that feel special but don’t demand hours of your time.
These bars are brilliant because they rely on a quick press-in base, a set-in-the-freezer filling, and a rich chocolate top. You get that wonderful crunch, the bright burst of berry flavor, and the deep richness of chocolate all in one easy bite. Seriously, they look fancy, but they are shockingly simple to pull together.
Jump to:
Why You Will Love These Strawberry Chocolate Bars
I know you’re busy, which is why I’m so excited to share this recipe. These **Strawberry Chocolate Bars** are a total game-changer when you need something amazing fast. They require zero oven time, which is my favorite kind of baking! They set up beautifully in the freezer, meaning you spend more time enjoying them and less time fussing over temperatures.
- They are completely no-bake, making cleanup a breeze!
- The layers separate perfectly, giving you that satisfying crunch and creaminess in every bite.
- These **Strawberry Chocolate Bars** are easy to store and perfect for packing in lunch boxes or taking to potlucks.
- The combination of tart strawberry and rich chocolate is just addictive—you’ll be reaching for more of these **Strawberry Chocolate Bars**.
Quick Assembly for Perfect Strawberry Chocolate Bars
Honestly, the active time for these bars is peanuts. You mix the base, press it in, pour the filling, and then melt the topping. That’s it! I bet you can have these completely assembled and chilling in the freezer in under 15 minutes total. It’s the best way to make impressive **Strawberry Chocolate Bars** without turning on the oven.
Flavor Profile of Your Strawberry Chocolate Bars
Get ready for a taste explosion! You start with that salty, slightly sweet, crunchy oat biscuit base. Then, bam! You hit that bright, tangy strawberry layer—it just cuts through the richness perfectly. Finally, the thick, smooth dark chocolate topping melts in your mouth. It’s textural heaven, I’m telling you.
Gathering Ingredients for Strawberry Chocolate Bars
Okay, shopping time! Since these **Strawberry Chocolate Bars** are no-bake, the quality of your few ingredients really has to shine through. Don’t skimp on the chocolate, trust me! I always grab my staples before I start mixing, because once you start, things move fast. You only need a few simple things to build these beautiful layers, but pay attention to those measurements—they matter when you aren’t using flour and eggs to give structure.
Measuring for the Crunchy Base
For the foundation that gives us that necessary crunch, you’ll need exactly one and a half cups of crushed oat biscuits. Make sure they are finely crushed, almost like coarse sand! Then, you’ll bind that with exactly one-third of a cup of coconut oil. Make sure your oil is melted but not hot when you mix it in, otherwise, you’ll get a greasy mess instead of a pressable crust.
Preparing the Bright Strawberry Layer
This is where we switch from the original citrus flavor, and we need real brightness here. You’ll use half a cup of creamy coconut cream—make sure you scoop the thick part from the top of a chilled can! Then, whisk in a quarter cup of pure strawberry puree. If you’re using fresh strawberries, blend them until totally smooth, but strain out any big seeds if that bothers you. We also need two tablespoons of maple syrup to give it just a touch of sweetness to balance that berry tartness.
Selecting Chocolate for Your Strawberry Chocolate Bars
For the top layer that seals everything in, we need one and a half cups of dairy-free chocolate chips. I prefer semi-sweet for these **Strawberry Chocolate Bars** so it’s not overly sweet against the fruit. You will melt those chips down with two tablespoons of coconut oil. That extra oil is key—it keeps the chocolate topping soft enough to slice cleanly later, which is crucial for nice bars!
Step-by-Step Instructions for Strawberry Chocolate Bars
Alright, let’s get these delicious **Strawberry Chocolate Bars** put together! Since this is a no-bake recipe, timing our chill sessions is the most important part. Don’t rush the freezing, or your layers will get muddy when you try to cut them later. I always put on some good music during this part, because it’s assembly line fun!
Creating the Base Layer of Your Strawberry Chocolate Bars
First things first, grab an 8×8 inch pan—or similar size—and line it completely with parchment paper, making sure you leave some overhang on the sides. That overhang is your handle for lifting the whole thing out later, so don’t skip it! In a medium bowl, dump in your crushed oat biscuits and the melted coconut oil. Stir it up until everything looks evenly moistened, like wet sand. Now, dump that mixture into your prepared pan. Here’s the secret: press it down really firmly! I use the bottom of a flat measuring cup to compact it until it’s rock solid. This firm base is what keeps everything from crumbling apart.
Setting the Strawberry Filling
Time for the bright middle layer! Whisk together your coconut cream, strawberry puree, and maple syrup in a small bowl until it’s totally smooth and uniform in color. Pour this lovely pink mixture right over your pressed base. Gently tilt the pan until the top is perfectly level—you want an even thickness across the whole pan. Pop this into the freezer for one full hour. Seriously, set a timer! It needs to be firm enough that the warm chocolate won’t sink into it when you pour it on top.
Finishing Your Strawberry Chocolate Bars with Chocolate
Once that strawberry layer is frozen solid, it’s time for the grand finale! In a microwave-safe bowl, combine your dairy-free chocolate chips and the extra two tablespoons of coconut oil. Microwave this in 30-second bursts, stirring well between each burst, until it’s smooth and glossy. Be careful not to scorch the chocolate! Once melted, pull your pan out of the freezer and pour that melted chocolate right over the top. Use an offset spatula to spread it quickly and evenly to the edges. We want a beautiful, smooth top for these **Strawberry Chocolate Bars**.
Final Chill and Cutting
Now, back into the freezer it goes! This final chill only needs about 20 minutes, just long enough for the chocolate topping to set up hard. When it’s done, use those parchment paper handles to lift the whole slab out onto a cutting board. Use a big, sharp knife—wiping it clean between cuts helps a lot—and slice it into 12 neat bars. If the chocolate cracks when you cut, it means it was too cold! Let it sit on the counter for five minutes before slicing.
Essential Equipment for Making Strawberry Chocolate Bars
You don’t need a ton of fancy gear for these bars, which is part of the charm! You’ll definitely want an 8×8 inch square baking pan, or something close to that size, to get the right thickness. Make sure you have good quality parchment paper, because that’s your best friend for easy removal later on.
- A medium mixing bowl for the base.
- A small bowl for the strawberry layer.
- A microwave-safe bowl for melting the chocolate topping.
- A sturdy spatula or the back of a measuring cup for pressing the base down firmly.
Tips for Success with Strawberry Chocolate Bars
Even though these bars are simple, a few little tricks can make the difference between a good batch and an absolutely knockout batch of **Strawberry Chocolate Bars**. It’s all about managing temperature and pressure when you’re building those layers! Don’t worry if your first batch isn’t perfect; mine certainly weren’t when I first started experimenting with fruit purees in no-bake recipes. If you enjoy simple, no-bake treats, you might also love my recipe for No Bake Sugar Free Strawberry Cheesecake.
Achieving the Right Base Consistency
The absolute most important thing here is pressing that oat biscuit base down like you mean it! Do not be shy. If you leave any loose spots or don’t press it firmly into every corner of the pan, that base will crumble the minute you try to lift or slice the bars later. I like to use a heavy, flat-bottomed glass or a metal measuring cup just for this job. Really compact it until it feels like a solid cookie crust. A solid foundation is everything for beautiful **Strawberry Chocolate Bars**.
Avoiding Cracks in the Chocolate Topping
The second most common issue is a cracked chocolate top, and that happens when the temperature difference between the frozen layer and the melted chocolate is too extreme. When you take the strawberry layer out of the freezer, let it sit on the counter for just five minutes before pouring the warm chocolate over it. Also, when melting your chocolate and oil, make sure you stir it really well so there are no super-hot spots. Spreading the chocolate gently, rather than plopping it down in one spot, also helps prevent those awful fissures when it sets! For more tips on achieving perfect dessert layers, check out this guide on no-bake cheesecake techniques.
Storing Your Homemade Strawberry Chocolate Bars
These **Strawberry Chocolate Bars** are fantastic because they keep so well, provided you treat them right! Since they are no-bake and rely on that frozen layer, they absolutely need to stay cold to keep their structure. I always make a big batch, and they last us quite a while if we can resist eating them all in the first two days—ha! If you are looking for other easy desserts, you might enjoy my recipe for Frosted Zucchini Spice Bars.
Optimal Storage Environment
You must keep these bars refrigerated. Don’t even think about leaving them on the counter for too long, especially if your kitchen is warm, because the coconut oil base and topping will soften up fast. Line an airtight container with a piece of parchment paper on the bottom, stack your bars inside (maybe with another piece of parchment between layers if you stack them high), and seal it up tight. They stay perfectly good for about a week this way.
Reheating or Serving Temperature
When you pull these **Strawberry Chocolate Bars** straight from the fridge, the chocolate topping can be a little too hard, and the base might feel stiff. For the absolute best texture—that perfect snap on the chocolate and a slightly softer, chewy base—I always let them sit out on the counter for about 10 to 15 minutes before serving. This little bit of warmth brings out the flavor of the strawberry layer, too!
Frequently Asked Questions About Strawberry Chocolate Bars
I get so many questions about these bars because everyone wants theirs to turn out just right! Since we’re working with layers that set up without baking, people often have concerns about texture and ingredient swaps. Here are the things I hear most often from readers! If you are interested in other fruit-based desserts, check out my Baked Pears.
Can I Substitute Ingredients in Strawberry Chocolate Bars
That’s a great question! For the base, you can substitute graham crackers for the oat biscuits, but you might need a tiny bit more coconut oil to get it to stick together, as graham crackers tend to be drier. For the sweetener, you can swap the maple syrup for agave nectar or even just plain white sugar, though I prefer the maple flavor it adds to the strawberry layer. If you are making **Strawberry Chocolate Bars** for someone who can’t have coconut, you can use melted butter in the base instead of oil, but you must reduce the chilling time, as butter sets up differently than coconut oil.
How Long Do These Bars Last
As I mentioned before, these **Strawberry Chocolate Bars** need to stay cold to keep their structure! When stored properly in an airtight container in the refrigerator, they are fantastic for about one week. If you need them to last longer than that, you can absolutely freeze them! If you freeze them, just remember to let them thaw on the counter for about 20 minutes before slicing or eating.
Nutritional Estimate for Strawberry Chocolate Bars
Since these bars rely on simple, whole ingredients like oats and natural sweeteners, they are a great treat to have on hand! Remember that these numbers are just my best guess based on the ingredients listed above, so they are not exact science. You can see the main estimates broken down below:
| Serving Size: | 1 bar |
| Calories: | 250 |
| Fat: | 18g |
| Carbohydrates: | 22g |
| Protein: | 3g |

Amazing 12-Minute Strawberry Chocolate Bars
- Total Time: 1 hour 20 minutes
- Yield: 12 bars
- Diet: Vegetarian
Description
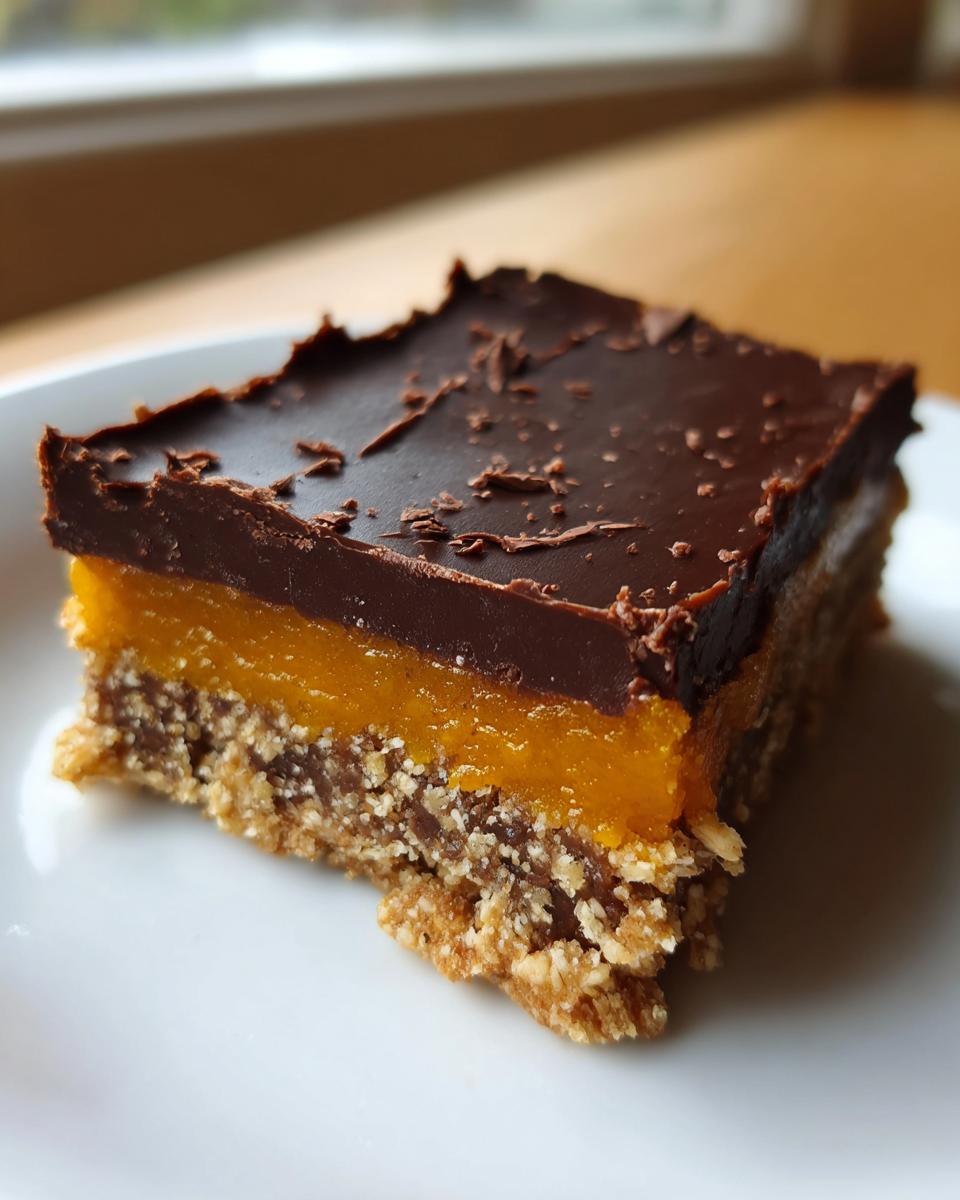
Anna Kowalska here, sharing homemade recipes made with heart and flavor that your family will enjoy. If you seek simple, delightful desserts, look no further than these Chocolate Orange Bars. This recipe combines a crunchy base, a bright citrus layer, and rich chocolate. You will love the layered texture and bold flavor.
Ingredients
- Base Layer: 1½ cups crushed oat biscuits
- Base Layer: ⅓ cup coconut oil
- Orange Layer: ½ cup coconut cream
- Orange Layer: ¼ cup orange juice
- Orange Layer: 2 tbsp maple syrup
- Chocolate Layer: 1½ cups dairy free chocolate chips
- Chocolate Layer: 2 tbsp coconut oil
Instructions
- Line pan with parchment paper.
- Mix biscuits and coconut oil, press into pan.
- Stir orange layer ingredients and spread over base. Freeze 1 hour.
- Melt chocolate and coconut oil.
- Spread on top and freeze 20 minutes.
- Slice into bars.
Notes
- Keep refrigerated for best texture.
- Prep Time: 15 minutes
- Cook Time: 5 minutes
- Category: Dessert
- Method: No-Bake, Freezing
- Cuisine: American
Nutrition
- Serving Size: 1 bar
- Calories: 250
- Sugar: 15g
- Sodium: 50mg
- Fat: 18g
- Saturated Fat: 12g
- Unsaturated Fat: 6g
- Trans Fat: 0g
- Carbohydrates: 22g
- Fiber: 2g
- Protein: 3g
- Cholesterol: 0mg