Skip to content
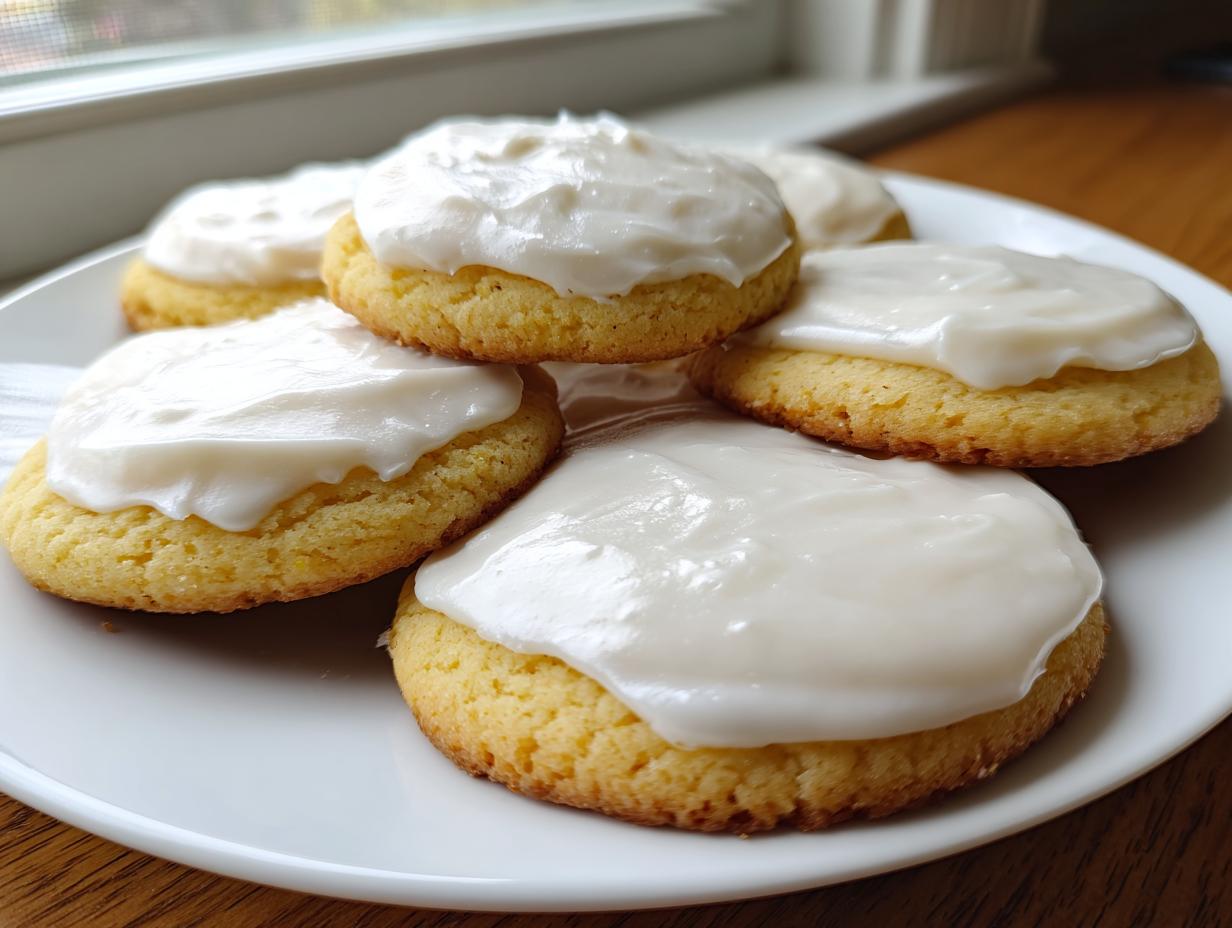
If you’ve been scrolling endlessly looking for a way to enjoy classic holiday treats without the sugar spike, you’ve hit the jackpot! These amazing Sugar-Free “Sugar” Cookies with Sugar-Free “Sugar” Icing are proof that you don’t have to sacrifice flavor for dietary goals. I’m Anna Kowalska, and here I share tried-and-true homemade recipes that you and your family will love; everything is made with heart and flavor, and these cookies are no exception.
Forget those chalky, sad versions of low-sugar cookies you might have tried before. I spent ages tinkering with the right combination of butter, flour, and stevia blend to get that perfect snap and melt-in-your-mouth texture. The best part? The icing sets up beautifully, making them look just like the real deal. You get all the fun of rolling and cutting shapes without any of the guilt. Trust me, once you try this recipe, it’ll be your go-to for birthdays, holidays, or just a Tuesday afternoon treat!
Jump to:
Essential Ingredients for Sugar-Free “Sugar” Cookies with Sugar-Free “Sugar” Icing
Okay, listen up, because getting the ingredients right is half the battle when dealing with sugar substitutes! For these Sugar-Free “Sugar” Cookies with Sugar-Free “Sugar” Icing to taste genuinely fantastic, we need good quality basics and the right sweetener. We are aiming for that classic, buttery cookie flavor, just without the actual sugar. Don’t skimp on softening that butter—it makes a huge difference in the creaming process!
Cookie Dough Components
These are the items that build the structure and flavor of our cookie base:
- ½ cup unsalted butter, softened completely
- ¼ cup Pyure Organic All Purpose Stevia Blend (this is our primary sweetener here!)
- 1 large egg
- 1 teaspoon vanilla extract
- 1 ¼ cups all-purpose flour
- ½ teaspoon baking powder
- ¼ teaspoon salt
Sugar-Free “Sugar” Icing Ingredients
The icing needs to be sturdy enough to decorate with but smooth enough to spread nicely. Cornstarch is our secret helper here!
- ½ cup cornstarch
- 3 tablespoons Pyure Organic All Purpose Stevia Blend (the icing needs a little more sweetness punch)
- 2 tablespoons unsalted butter, softened
- ¼ cup milk, or whatever you need to get it smooth
- 1 teaspoon vanilla extract
- 1 drop Food coloring (if you want to make them festive!)
Equipment Needed for Perfect Sugar-Free “Sugar” Cookies with Sugar-Free “Sugar” Icing
You don’t need a fancy setup for these cookies, but having the right tools makes the process much smoother. For achieving that perfect roll-out and smooth finish on your Sugar-Free “Sugar” Cookies with Sugar-Free “Sugar” Icing, grab your stand mixer or a trusty hand mixer for the creaming step.

You’ll also need:
- A sturdy mixing bowl
- Cookie cutters in whatever fun shapes you love
- Parchment paper (a lifesaver!)
- A rolling pin
- Baking sheets
- Wire cooling racks
Step-by-Step Instructions for Sugar-Free “Sugar” Cookies with Sugar-Free “Sugar” Icing
This is where the magic happens! Making these Sugar-Free “Sugar” Cookies with Sugar-Free “Sugar” Icing requires a little patience, especially with the chilling, but I promise the payoff is worth every minute. Follow these steps exactly, and you’ll have cookies that taste just like the real deal!
Preparing the Cookie Dough Base
We start by building our buttery foundation. Grab your mixer and put that softened butter and the ¼ cup of Pyure Stevia Blend in the bowl. You need to beat these two together until they look light and fluffy—this is critical for texture! Don’t rush this part; it takes a minute to incorporate air.
Once it’s fluffy, beat in your egg until everything looks nicely combined. Then, drizzle in that vanilla extract and mix briefly. Now for the dry stuff: whisk your flour, baking powder, and salt together in a separate bowl first. This ensures everything is evenly distributed before it hits the wet ingredients.
Slowly add the dry mixture into the butter mixture in two separate additions, mixing just until it comes together. Seriously, stop mixing as soon as the streaks of flour disappear. If you overmix, these cookies get tough, and we definitely don’t want that! Once it forms a shaggy dough, wrap it up tight in plastic wrap. It absolutely needs to chill in the fridge for at least 30 minutes. This resting period stops the cookies from spreading into weird shapes while they bake.
Shaping and Baking Your Sugar-Free “Sugar” Cookies
Once chilled, you can get to the fun part! Preheat your oven to 350 degrees F now so it’s ready when you are. Dust your counter or a sheet of waxed paper lightly with flour. Roll the dough out evenly to about ¼-inch thick. Grandma always said if it’s too thin, it burns; too thick, and it won’t cook through properly.
Use your cookie cutters to press out all your shapes and place them about two inches apart on a baking sheet lined with parchment paper. Don’t try to cram them too close together! Bake them for 10 to 12 minutes. You are looking for them to be just golden around the edges. If you pull them out when they are just starting to turn golden, they will have the best texture later. Let them cool completely on the racks before even thinking about icing them!
Making and Applying the Sugar-Free “Sugar” Icing
While the cookies cool, let’s whip up that fantastic icing. In a clean bowl, beat the cornstarch, the 3 tablespoons of Pyure Stevia Blend, and the 2 tablespoons of softened butter until it’s looking crumbly but well combined. I usually use medium-high speed here to get it going.
Now, add the milk and vanilla gradually. Keep adding milk just a tiny bit at a time until it smooths out into a thick, spreadable consistency. If it looks too thick to work with, add a splash more milk. If you are coloring them, add just one tiny drop of food coloring and mix it in until you get the perfect shade. The icing needs a quick 10-minute chill in the fridge to firm up just enough so it spreads nicely without running everywhere. Once cooled, spread or pipe it on your cookies right away. I find these are best eaten the same day!

Tips for Achieving Expert Results with Your Sugar-Free “Sugar” Cookies
Even though these are Sugar-Free “Sugar” Cookies with Sugar-Free “Sugar” Icing, they still need a little direction to turn out absolutely perfect! My biggest piece of advice, which I learned the hard way, is to really watch those cookies during the last few minutes of baking. You absolutely must bake them until they are golden brown.
If you pull them out too early because you’re worried about the edges, they might end up soft when you wanted that classic sugar cookie snap. They firm up as they cool, but the color tells you they are done!
Another thing that makes decorating so much easier is chilling the icing briefly. If your icing seems a little too runny right after mixing, pop it in the fridge for about 10 minutes. It firms right up, giving you a much better spreading consistency, which is key for pretty designs. These little steps ensure your low-sugar dessert looks and tastes like a masterpiece every single time!
Common Questions About Sugar-Free “Sugar” Cookies with Sugar-Free “Sugar” Icing
I get so many questions about baking with alternative sweeteners! People are always worried about texture or taste, but I promise these Sugar-Free “Sugar” Cookies with Sugar-Free “Sugar” Icing are the real deal. Here are some of the things I hear most often when people are trying this recipe for the first time.
Q1. Will these taste overly sweet or have a strange aftertaste because of the stevia?
That’s the best part about using the Pyure blend! Because we use it in both the cookie and the icing, and we balance it with butter and vanilla, the flavor is incredibly neutral. Unlike some sweeteners, these Stevia Cookies taste just like traditional sugar cookies. If you find it’s too sweet for your liking, you can slightly reduce the amount in the icing, but I stick to the recipe for the best flavor balance.
Q2. Can I use a different sweetener instead of the Pyure Stevia Blend?
I really recommend sticking to a cup-for-cup blend like the one listed. Other sweeteners, like pure erythritol or monk fruit, measure differently and behave very differently when baked. If you must substitute, make sure you use a sweetener that measures 1:1 with sugar for the best results in this dough. This recipe was specifically developed around that blend for the best outcome as a Low Sugar Dessert. For more information on how different sweeteners behave in baking, you can check out resources on sweetener comparisons.
Q3. My icing is too thin! How do I fix it without adding more sugar substitute?
Don’t panic! If your icing is too runny, it usually means you added too much milk. The best fix is to add a little more cornstarch, just a half teaspoon at a time, and beat it in well. Alternatively, chilling the icing for 15 or 20 minutes will firm it up enough to spread perfectly over your Sugar-Free “Sugar” Cookies with Sugar-Free “Sugar” Icing.
Q4. Can I make these cookies ahead of time?
You absolutely can! The cookie dough keeps well wrapped up in the fridge for a few days. However, the icing is best used the day it’s made, as it can get a little grainy or soft if stored for too long. For the best results, bake the cookies, cool them totally, and then ice them the next day. If you are looking for other great dessert recipes, check out my collection!
Storing Your Delicious Sugar-Free “Sugar” Cookies
Since these Sugar-Free “Sugar” Cookies with Sugar-Free “Sugar” Icing are best when fresh, storage is important to maintain that perfect texture. The biggest thing to remember is the icing! Because the icing has milk and butter, these cookies don’t sit out on the counter for weeks like some traditional baked goods.
I always recommend eating them within 24 hours of icing them for the absolute best experience. If you absolutely must store them longer, the refrigerator is your friend, but you need to take a couple of precautions to keep them from getting soggy or absorbing fridge smells.
If you plan on making a huge batch, store the un-iced cookies in an airtight container at room temperature for up to three days before icing them. Here is a quick guide for keeping your hard work fresh:
| Storage Location | Condition of Cookie | Maximum Time |
|---|---|---|
| Room Temperature | Un-iced only, airtight container | 3 Days |
| Refrigerator | Iced cookies, airtight container | 5 Days |
| Freezer | Un-iced cookies only, wrapped well | 2 Months |
Understanding the Data for This Low Sugar Dessert
Now, you know I bake everything with heart and flavor, but when we start swapping out real sugar for alternatives like stevia blends, the exact nutritional breakdown can get a little fuzzy! For these wonderful Sugar-Free “Sugar” Cookies with Sugar-Free “Sugar” Icing, please treat the numbers below as a helpful estimate only. Understanding nutrition labels can be tricky when using alternative ingredients.
Because brands of stevia, flour, and even butter can vary slightly, the precise counts aren’t guaranteed. These figures give you a good idea of what you’re looking at for this delicious Low Sugar Dessert.
| Nutritional Note | Detail |
|---|---|
| Serving Size | 1 cookie (approximate) |
| Sugar Content | Reported as 0g |
| Data Accuracy | Nutrition varies based on exact ingredients and brands used. |
Share Your Experience Making These Cookies
I truly hope you enjoyed making these delightful treats! If you whipped up a batch of these Sugar-Free “Sugar” Cookies with Sugar-Free “Sugar” Icing, I’d absolutely love to hear about it. Did you use fun cookie cutters? Did you try the orange juice trick in the icing? Drop a comment below, tell me how they turned out, and don’t forget to give the recipe a star rating!
Print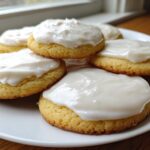
Amazing 10 Sugar-Free “Sugar” Cookies
- Total Time: 62 minutes (includes chilling)
- Yield: Varies based on cookie cutter size
- Diet: Low Fat
Description
Sugar-Free “Sugar” Cookies with Sugar-Free “Sugar” Icing. You get classic cookie taste without the sugar.
Ingredients
- ½ cup unsalted butter, softened
- ¼ cup Pyure Organic All Purpose Stevia Blend
- 1 egg
- 1 teaspoon vanilla extract
- 1 ¼ cups all-purpose flour
- ½ teaspoon baking powder
- ¼ teaspoon salt
- ½ cup cornstarch
- 3 tablespoons Pyure Organic All Purpose Stevia Blend (for icing)
- 2 tablespoons unsalted butter, softened (for icing)
- ¼ cup milk, or as needed (for icing)
- 1 teaspoon vanilla extract (for icing)
- 1 drop Food coloring (optional)
Instructions
- Beat butter with Pyure Organic All Purpose Stevia Blend until light and fluffy.
- Beat in egg until well blended. Beat in vanilla.
- Whisk flour, baking powder and salt together. Stir into butter mixture in two additions.
- Wrap dough in plastic wrap and refrigerate for 30 minutes.
- Roll dough on lightly floured surface or between sheets of waxed paper to 1/4-inch thick.
- Using desired cookie cutter, cut out desired shapes.
- Preheat oven to 350 degrees F. Place cookies 2-inches apart on parchment paper lined baking sheets.
- Bake for 10 to 12 minutes or until golden. Let cool on racks.
- Beat cornstarch, Pyure Organic All Purpose Stevia Blend and butter with a mixer on medium-high speed until well combined for the icing.
- Gradually add milk and vanilla until smooth. Add more milk if icing mixture is too dry.
- If adding food coloring, add a drop at a time until desired color is reached.
- Refrigerate icing for 10 minutes until set.
- Spread or pipe icing over cooled cookies. Use the same day.
Notes
- Replace milk with orange juice to create a light citrus flavor in the icing.
- Bake cookies until golden brown for the best texture.
- Chill the icing briefly to achieve a better spreading consistency.
- Prep Time: 20 minutes
- Cook Time: 12 minutes
- Category: Dessert
- Method: Baking
- Cuisine: American
Nutrition
- Serving Size: 1 cookie (approximate)
- Calories: 82
- Sugar: 0g
- Sodium: 39mg
- Fat: 5g
- Saturated Fat: 3g
- Unsaturated Fat: 2g
- Trans Fat: 0g
- Carbohydrates: 8g
- Fiber: 0g
- Protein: 1g
- Cholesterol: 21mg