Skip to content
If you’ve ever walked into a German bakery and wished you could replicate that perfect combination of chewy crust, soft interior, and deep, tangy flavor right in your home kitchen, then you’ve come to the absolute right place! The Best Sourdough Pretzels (Easy Overnight Recipe) are totally achievable, even if you think pretzels are too complicated. Forget those dry, store-bought knots; we’re aiming for pretzels that truly *sing*.
I’m Anna Kowalska, and here I share tried-and-true homemade recipes that you and your family will love. Everything I share here is made with heart and flavor, and I promise, these pretzels deliver on both! My goal is always to simplify those intimidating recipes so you can bring that incredible, artisan quality to your own table without breaking a sweat.
This overnight method is the secret weapon here. It lets the sourdough starter do the heavy lifting, developing flavor while you sleep, so you wake up to dough that practically shapes itself. We’re talking about that classic, satisfying chew that only good fermentation and a quick dip in that bubbly baking soda bath can give you. Trust me, once you taste these, you won’t look back!
Jump to:
Essential Components for The Best Sourdough Pretzels (Easy Overnight Recipe)
Making truly fantastic sourdough pretzels hinges on a few key details. The active starter is non-negotiable because that’s where all the deep, wonderful tang comes from. Precision in measuring the flour and salt ensures the dough develops that perfect, chewy structure we’re after in The Best Sourdough Pretzels (Easy Overnight Recipe).
Ingredient Selection and Preparation Guidance
Your starter needs to be bubbly and recently fed—if it floats in water, you’re good to go! I use bread flour if I have it, but all-purpose works fine too. Remember that brown sugar is important; it feeds the yeast and adds depth that white sugar just can’t match. Always measure liquids by weight if you can, especially that warm water for waking up the starter!
Equipment Needed for The Best Sourdough Pretzels (Easy Overnight Recipe)
You don’t need a million gadgets, but a few things make life easier. A stand mixer with a dough hook really helps develop the gluten quickly. You absolutely must have a large, sturdy pot for the boiling bath—don’t use anything too shallow! And definitely make sure you have good parchment paper for lining those baking sheets for The Best Sourdough Pretzels (Easy Overnight Recipe).
Mixing and Developing The Best Sourdough Pretzels (Easy Overnight Recipe) Dough
Okay, let’s get our hands dirty! This is where the magic starts, and it’s surprisingly hands-off once you get the initial mix done. Grab your stand mixer bowl—or a very sturdy regular bowl if you’re kneading by hand, which gives you a good workout, by the way! You start by waking up that bubbly starter in some warm water with your brown sugar. It should look happy and slightly foamy.
Next, we toss in the dry stuff: the flour and the salt, along with that melted butter for richness. Just mix it on low speed or stir with a wooden spoon until everything comes together in what I call a “shaggy mess.” Don’t panic! It looks terrible, but that’s exactly what you want before kneading begins. That shaggy stage means all the flour has been hydrated.
Now, switch to the dough hook if you’re using a mixer, or turn it out onto a lightly floured surface. You need to knead this dough until it gets beautifully smooth. For The Best Sourdough Pretzels (Easy Overnight Recipe), you’re looking for about five to seven minutes of good kneading. If you’re using a stand mixer, keep it on low speed so you don’t overheat the dough. The goal is to build up that gluten structure so the pretzel holds its shape and gets that signature chew later on.
Achieving the Right Dough Consistency
When you think you’re done kneading, give it a little poke. If it resists gently and springs back slowly, you’ve hit the jackpot! The dough should feel smooth all over, not sticky or overly tacky. It should look uniform, without any dry patches of flour hiding anywhere. This perfectly developed texture is what separates a good pretzel from a truly great one.
The Overnight Fermentation Process for Deep Flavor
This is where we separate our sourdough pretzels from the quick, yeasty versions you might try during the week. That long, slow fermentation—the overnight rest—is absolutely crucial for developing that deep, complex, slightly tangy flavor that sourdough is famous for. If you rush this step, you end up with just bread dough; we want nuance!
You have two great options here, depending on your schedule. If you mix the dough in the afternoon, you can let it sit on the counter, covered, for about four to six hours. This gives you a nice, moderate rise. But for the *best* flavor, I highly recommend popping that covered bowl right into the refrigerator overnight.
A slow, cold ferment in the fridge slows down the yeast activity but lets those lactic acid bacteria really get to work, building incredible depth. When you pull that cold dough out the next morning, it will still need a little time to warm up before shaping, but trust me, the flavor payoff is worth the morning wait. It’s that slow development that makes these pretzels truly special.
Shaping Your Soft Pretzels
Alright, the dough is ready, smelling perfectly tangy and ready to be transformed! First things first: punch that dough down gently to release the gas, but don’t overwork it—we want to keep some of that air in there. Now, divide that beautiful mass into eight equal pieces. I usually eyeball it, but if you’re feeling fussy, grab a scale!
Take one piece and start rolling it out on a lightly floured surface. You’re aiming for a long rope, about 18 to 24 inches long. Don’t worry if it looks a little uneven; that just adds character! Let the ropes rest for about five minutes; this relaxes the gluten, making them easier to handle without snapping back on you.
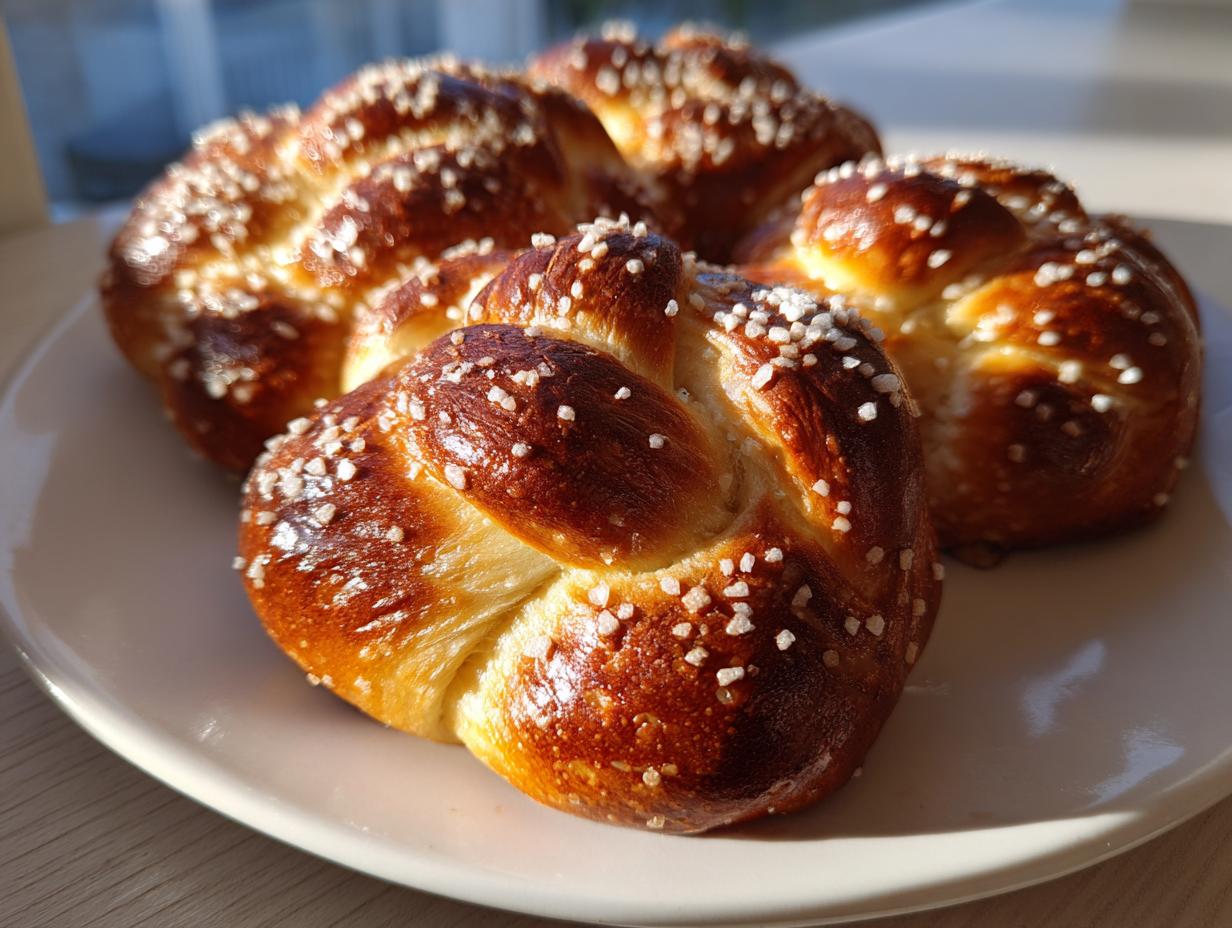
Here comes the fun part: shaping! Form your rope into a U-shape, cross the two ends over each other once, and then twist those ends around each other before bringing them down to gently press onto the bottom curve of the U. It sounds complicated, but after the first one, you’ll be flying! You want that classic, recognizable pretzel shape before they take their bath.
Mastering the Baking Soda Bath for The Best Sourdough Pretzels (Easy Overnight Recipe)
If you want that deep mahogany crust and that authentic, slightly savory pretzel flavor, you absolutely have to do the baking soda bath. This step is what changes a nice piece of sourdough bread into a true pretzel! Get a large pot and bring about six cups of water to a rolling boil. Now, here’s the important safety tip: when you add the baking soda, it’s going to erupt! I mean, it really bubbles up fast, so add it slowly and stand back a little. Never add it before the water is boiling hard.
Once the water is calm again, it’s time for dipping. Don’t overcrowd the pot; you might need to do this in batches depending on how many pretzels you shaped. Dip each pretzel, one at a time, and let it sit in that bubbly bath for exactly 30 seconds. Not 10 seconds, not a minute—thirty seconds is the sweet spot for The Best Sourdough Pretzels (Easy Overnight Recipe). Any longer and the crust gets weird; any shorter and you don’t get that signature chew.
Use a slotted spatula to gently lift the pretzel out of the bath, letting most of the water drip back into the pot. Lay them immediately onto your parchment-lined baking sheet. This quick, hot alkaline bath sets the crust beautifully before it even hits the oven. It’s a fast process, but it is the single most important step for achieving pretzel perfection!
Applying the Egg Wash and Toppings
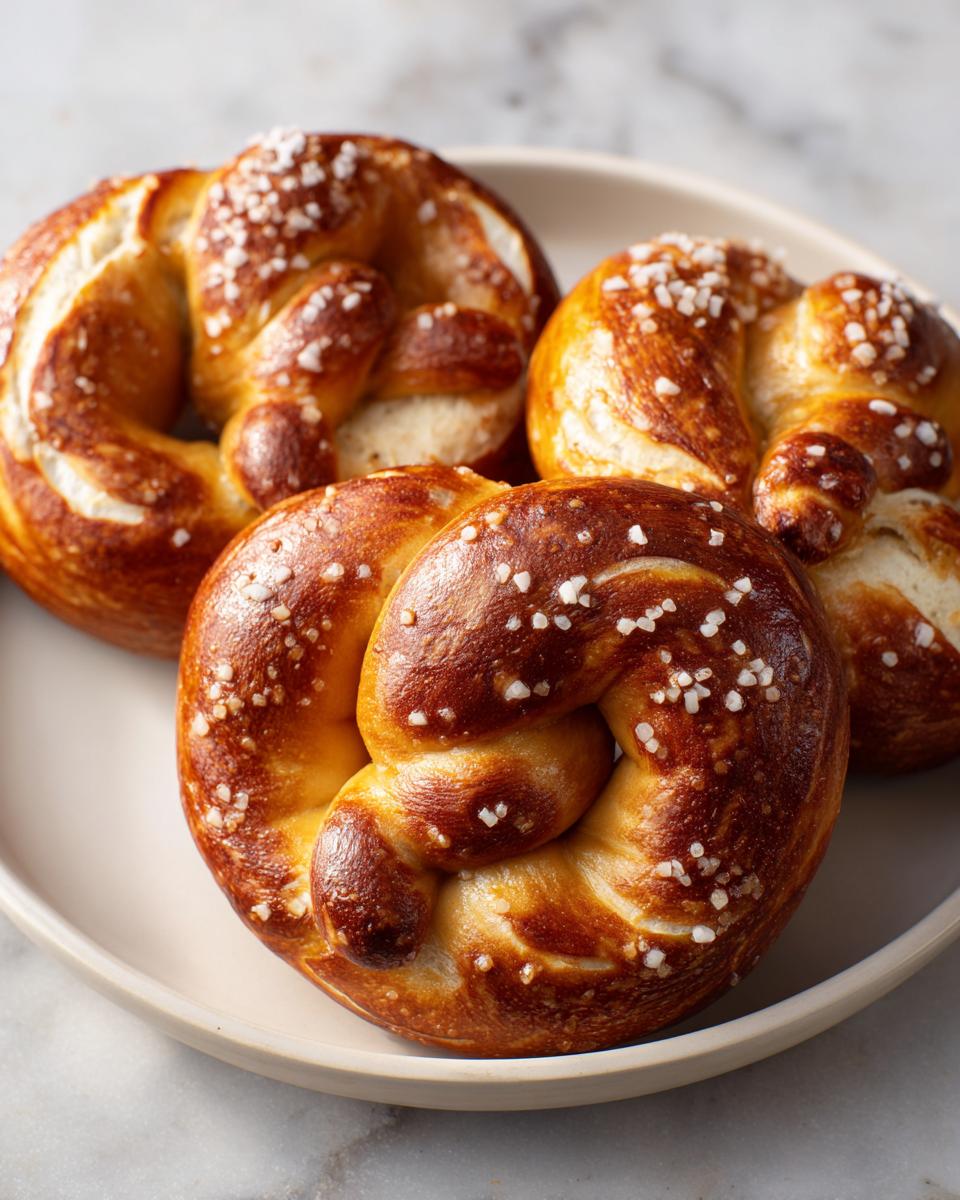
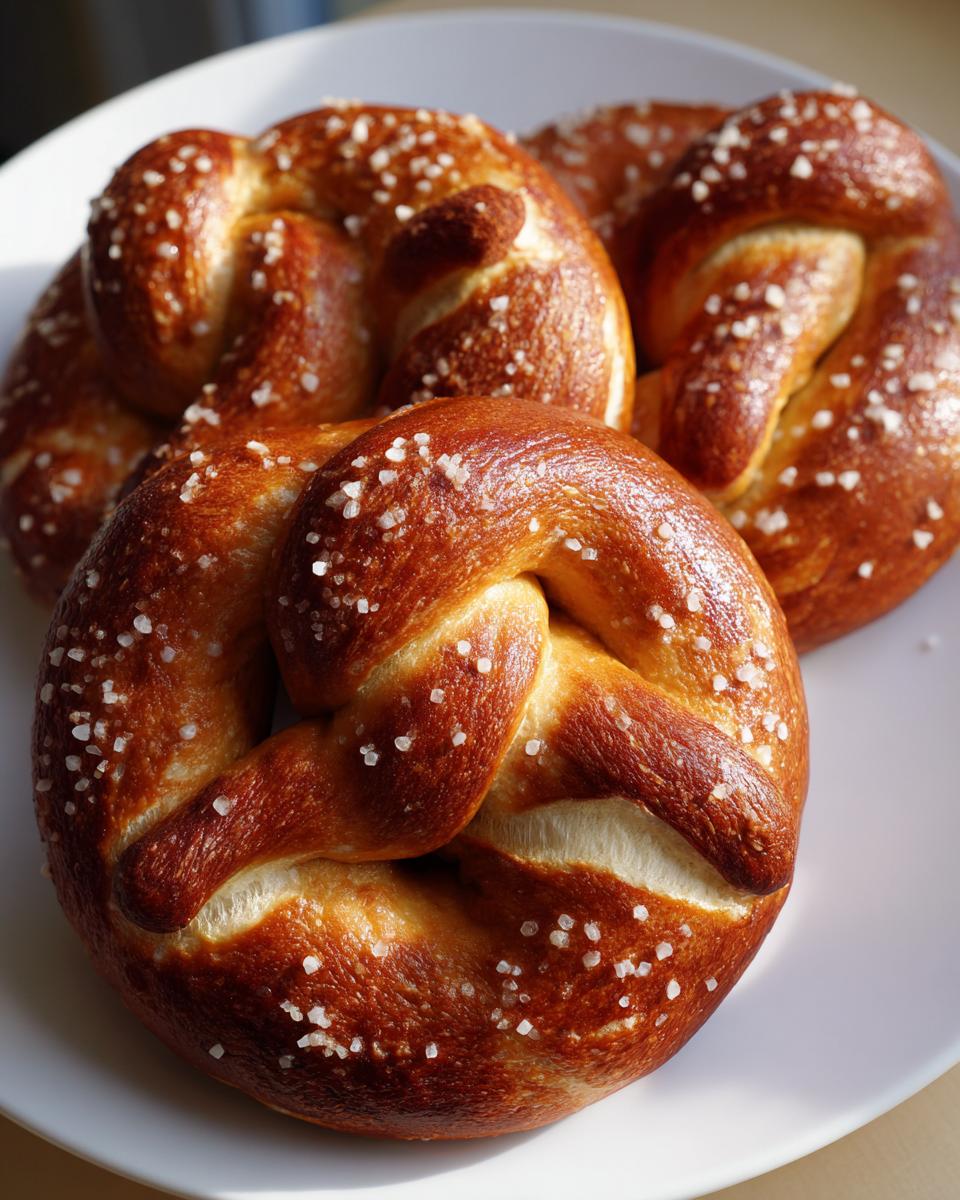
Once your dipped pretzels are resting on the sheet, it’s time for the color boost! Whisk up one large egg really well—this is your egg wash. The egg wash does two things: it helps the salt stick, and it gives the pretzels that gorgeous, deep golden shine when they bake. Brush the tops lightly but thoroughly.
Be generous with your salt now! Coarse kosher salt or proper pretzel salt is best here because the large crystals stand up to the heat. Sprinkle it liberally right over the egg wash. If you use fine table salt, it will melt right in and you won’t get that satisfying crunch. Make sure the tops are well-covered before they head into that hot oven!
Baking and Finishing Your Homemade Pretzels
Now for the grand finale! Make sure your oven is fully preheated to 425 degrees Fahrenheit (that’s 220 Celsius for my international friends). If the oven isn’t hot enough, the crust won’t set properly before the inside over-bakes. Lay those salted beauties on the parchment-lined sheets.
Slide them in and bake them for about 12 to 15 minutes. You’re looking for a deep, rich golden brown color—think beautiful mahogany, not pale yellow! Resist the urge to peek too early. Once they come out, the house will smell incredible, but you have to let them rest. Move the finished pretzels immediately onto a wire cooling rack. This step is vital because it lets air circulate underneath, keeping the bottoms from getting soggy as they cool down just a bit before you dive in!
Storing and Reheating Your Sourdough Pretzels
These pretzels are definitely best eaten the day you make them, warm from the oven! But if you happen to have leftovers—which is rare in my house—you need to store them correctly so they stay chewy and don’t turn rock hard. Don’t store them in an airtight container on the counter overnight; that traps moisture and makes them gummy. A simple paper bag works much better for short-term storage.
Storage and Reheating Table
| Storage Location | Duration | Reheating Method |
|---|---|---|
| Counter (Paper Bag) | Up to 2 days | 3-5 minutes at 350°F (175°C) |
| Freezer (Airtight Bag) | Up to 1 month | Thaw slightly, then bake at 350°F (175°C) until hot |
Common Questions About The Best Sourdough Pretzels (Easy Overnight Recipe)
I get so many questions when people first try making these at home, and that’s totally fair! Baking with sourdough can feel a little less straightforward than using commercial yeast, but honestly, once you understand the basics, it’s so rewarding. These pretzels are fantastic because the overnight rest simplifies everything, giving you that deep flavor without needing to babysit the dough all day. Let’s tackle some of the most frequent hurdles people run into when aiming for The Best Sourdough Pretzels (Easy Overnight Recipe).
Starter Activity and Substitutions
You absolutely must use an active starter, and I mean *bubbly* active. If your starter isn’t active, it means the yeast isn’t strong enough to create the necessary gas to give your pretzels a good rise and texture. An inactive starter leads to dense, flat pretzels. As for flour, while bread flour is my favorite because it has higher protein for better chew, all-purpose flour works just fine if that’s what you have on hand. Don’t substitute the brown sugar, though; it really helps the sourdough culture thrive!
Adjusting the Bath and Toppings
Can you skip the baking soda bath? Technically, yes, you can bake them without it, but I wouldn’t recommend it if you want that classic pretzel flavor and color. The bath is what makes them *pretzels*! If you are out of coarse kosher salt, you can use regular coarse sea salt, but sprinkle it on a little lighter so it doesn’t dissolve entirely during baking. You can also use sesame seeds or poppy seeds mixed with the egg wash if you want something different. Just make sure whatever you use is applied after the egg wash so it sticks!
Understanding the Nutritional Profile
I know some of you are watching macros, and while I focus mostly on flavor in my kitchen, it’s only fair to give you a ballpark idea of what’s in these amazing treats! Since every starter behaves differently, and flour brands vary slightly, these numbers are just estimates based on the standard recipe measurements we used. Remember, these are rich, satisfying sourdough pretzels, so they carry some good energy!
This information is based on dividing the total recipe yield into 8 servings. They are definitely a treat, but knowing what you’re eating helps you enjoy them guilt-free. I try to keep my baking sensible, but honestly, the flavor from the fermentation makes these worth every bite!
Estimated Nutrition Facts Table
| Nutrient | Estimate Per Serving |
|---|---|
| Calories | 380-420 kcal |
| Protein | 11g |
| Total Fat | 7g |
| Carbohydrates | 75g |
Please remember this is just an estimate based on standard ingredient measurements. Your actual results might vary based on the specific flour and amount of butter you use in your batch!
Print
Amazing 8 The Best Sourdough Pretzels
- Total Time: 13 hours (includes overnight rest)
- Yield: 8 pretzels 1x
- Diet: Vegetarian
Description
Make The Best Sourdough Pretzels using this easy overnight recipe. You get classic chewy pretzels with a deep flavor from the sourdough fermentation.
Ingredients
- ½ cup sourdough starter 100g (active sourdough starter)
- 1 cup warm water 110°F (240g)
- 1 tablespoon brown sugar or honey
- 4 cups all-purpose flour 480 grams or bread flour
- 2 teaspoons salt
- 2 tablespoons unsalted butter melted
- 6 cups water (for bath)
- 2 tablespoons baking soda (for bath)
- 1 large egg (for egg wash)
- Coarse salt kosher or pretzel salt (for topping)
Instructions
- In a stand mixer bowl or large bowl, combine the active starter, warm water, and sweetener. Stir to dissolve the sugar.
- Add the flour, salt, and melted butter. Stir until a shaggy dough forms.
- Knead the dough for 5-7 minutes until smooth and elastic. If using a mixer, use low speed for 5 minutes with a dough hook or paddle.
- Place the dough in a lightly greased bowl. Cover it with a damp towel or plastic wrap. Allow it to rise at room temperature for 4-6 hours, or overnight in the refrigerator for slower fermentation.
- Punch down the risen dough. Divide it into 8 equal pieces.
- Roll each piece into a long rope, about 18-24 inches long. Let the ropes rest briefly.
- Shape each rope into a classic pretzel: form a “U” shape, then twist the ends over the top.
- Place the shaped pretzels on a parchment-lined baking sheet.
- Preheat your oven to 425°F (220°C).
- Bring 6 cups of water to a boil in a large pot. Carefully add the baking soda and stir until dissolved.
- Dip each pretzel, one at a time, into the boiling baking soda bath for about 30 seconds.
- Return the dipped pretzels to the prepared baking sheet.
- Mix the egg and brush the tops of the pretzels with the egg wash.
- Sprinkle the pretzels liberally with coarse salt.
- Bake for 12-15 minutes, or until they turn golden brown and crispy.
- Cool the pretzels on a wire rack for a few minutes before you serve them warm.
Notes
- Make sure your sourdough starter is active and bubbly for the best flavor and rise.
- Be careful when adding baking soda to boiling water; it will bubble up significantly.
- You can change the toppings by adding sesame seeds, poppy seeds, or grated cheese.
- Prep Time: 30 minutes
- Cook Time: 15 minutes
- Category: Breads
- Method: Baking
- Cuisine: American
Nutrition
- Serving Size: 1 pretzel
- Calories: Estimate needed
- Sugar: Estimate needed
- Sodium: Estimate needed
- Fat: Estimate needed
- Saturated Fat: Estimate needed
- Unsaturated Fat: Estimate needed
- Trans Fat: Estimate needed
- Carbohydrates: Estimate needed
- Fiber: Estimate needed
- Protein: Estimate needed
- Cholesterol: Estimate needed